# 1:12 Scale Outdoor Deluxe Craftsman Dog House — Complete Architectural Plans & Build Guide
## Miniature Canine Architecture with Covered Porch, Lift-Off Roof, & Moisture Barrier Base
> **Scale Reference**: **1:12 Standard Miniature Dollhouse Scale** ($1" = 1\text{ foot}$ / $1\text{ inch} = 12\text{ inches}$)
> **Overall Dimensions**: **3.50" Wide × 4.50" Deep × 4.25" Peak Height** (Including Skid Base & Overhangs)
> **Real-World Equivalent**: **3 ft 6 in Wide × 4 ft 6 in Deep × 4 ft 3 in Peak Height**
> **Cabin Footprint**: **3.50" W × 3.25" D** (Real: 3 ft 6 in × 3 ft 3 in) with **1.25" Front Lounging Porch Deck**
> **Doorway Opening**: **1.25" Wide × 1.75" High Arch** (Real: 15" W × 21" H — ideal for 50–75 lb dog)
> **Material Primary Stock**: **ONE (1) Sheet of 1/8" (3mm) Baltic Birch Plywood or Basswood (12" × 24")**
> **Trim & Skid Stock**: **1/4" × 1/4" square basswood strip stock + 1/16" micro strip basswood**
> **Removable Roof**: Interlocking gable locator cleats allow the roof to lift off freely for interior access!
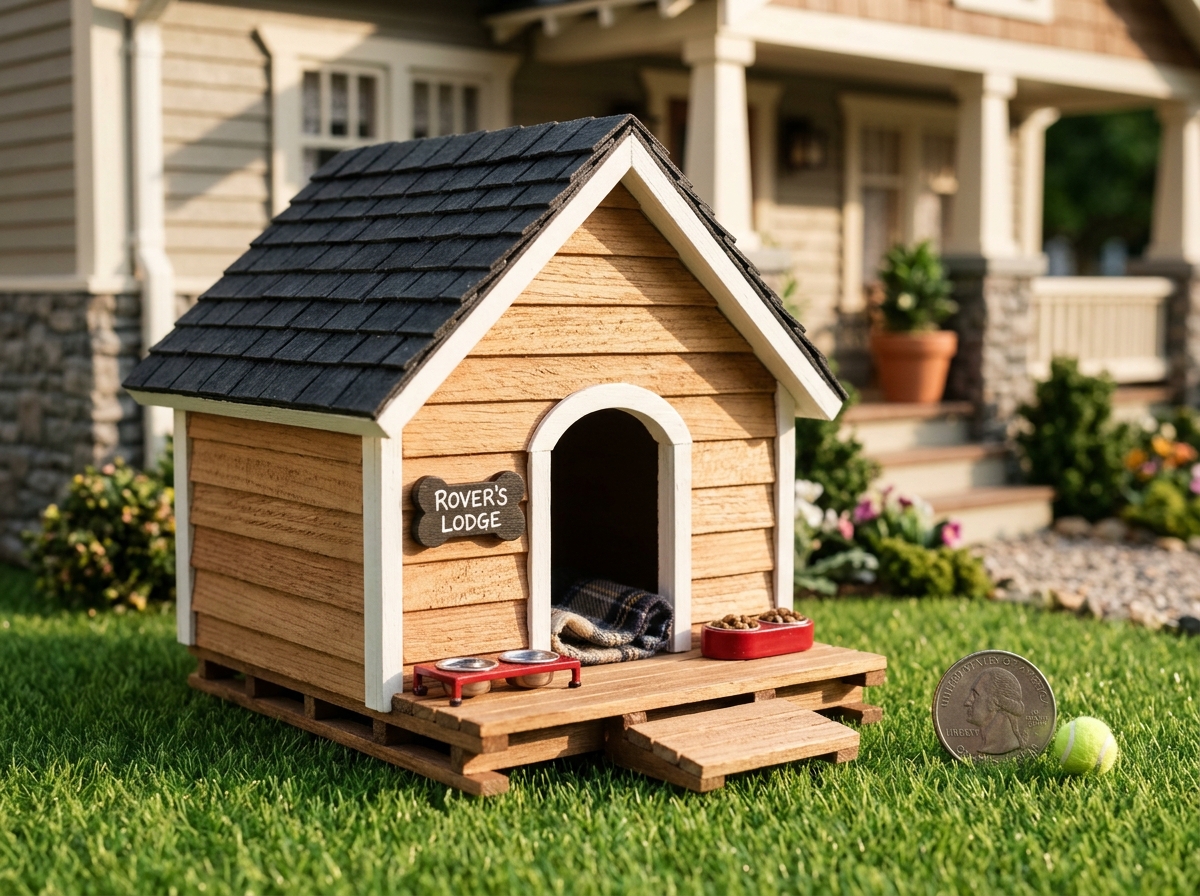
> **Photorealistic Renders**:
> • Exterior on Lawn: [images/doghouse_1_12_exterior.jpg](file:///c:/code2026/house/images/doghouse_1_12_exterior.jpg)
> • Workshop Construction View: [images/doghouse_1_12_workshop.jpg](file:///c:/code2026/house/images/doghouse_1_12_workshop.jpg)
>
> 
---
## 1. Executive Summary & Design Concept
This **1:12 Scale Outdoor Dog House** is engineered to combine authentic full-scale American Craftsman timber styling with precision miniature joinery. Designed to stand proudly on the lawn or patio of a 1:12 dollhouse plinth, it features real-world canine architectural principles:
1. **Elevated Skid Base (Moisture Barrier)**: In real life, sitting directly on wet soil rots dog houses and chills animals. Two 1/4" × 1/4" cedar skid runners lift the subfloor 1/4" (3 inches real scale) off the turf, guaranteeing dry airflow.
2. **Covered Front Lounging Porch**: A 1.25" (15" real) open deck shielded by an extended 45° gable overhang and twin 1/4" timber columns. Features a sunken double food and water bowl station and a two-step lawn ramp.
3. **Draft-Protected Sleeping Chamber**: The interior cabin ($3.25" \times 3.00"$ interior) is sized to house a plush miniature dog bed or fleece cushion. An optional off-center or centered arched doorway provides easy ingress while protecting the pet from wind and rain.
4. **Removable Lift-Off Roof for Dollhouse Playability**: A common frustration in miniature outbuildings is the inability to inspect or decorate the interior once glued. This design utilizes **dual interior triangular locator cleats (`P7`)** glued underneath the roof slope panels. The roof snaps squarely into place under gravity and lifts off effortlessly in one hand!
---
## 2. Master Dimension & Part Schedule (Dual-Unit)
All parts are designed from standard hobbyist sheet and strip stock. Measurements are given in inches (decimal and ruler fraction), millimeters, and 1:12 real architectural scale:
| Part ID | Part Name | Qty | Thickness | Width | Length / Height | 1:12 Real Scale | Material & Construction Notes |
| :--- | :--- | :---: | :---: | :---: | :---: | :---: | :--- |
| **P1** | **Base Floor & Porch Deck** | 1 | $1/8"$ (0.125") | $3.500"$ (3-1/2") | $4.500"$ (4-1/2") | 3' 6" × 4' 6" | Scored 1/4" plank lines to simulate cedar deck |
| **P2** | **Front Gable Wall** | 1 | $1/8"$ (0.125") | $3.500"$ (3-1/2") | $4.000"$ (4") | 3' 6" × 4' 0" | 2.25" eave height, 1.75" rise (45° pitch); 1.25" × 1.75" arch door |
| **P3** | **Rear Gable Wall** | 1 | $1/8"$ (0.125") | $3.500"$ (3-1/2") | $4.000"$ (4") | 3' 6" × 4' 0" | Identical 45° gable profile; optional 3/8" circle high vent |
| **P4** | **Left Side Wall** | 1 | $1/8"$ (0.125") | $3.000"$ (3") | $2.250"$ (2-1/4") | 3' 0" × 2' 3" | Cabin side wall; optional 1.00" × 1.00" 4-pane window cutout |
| **P5** | **Right Side Wall** | 1 | $1/8"$ (0.125") | $3.000"$ (3") | $2.250"$ (2-1/4") | 3' 0" × 2' 3" | Scribed with 3/16" horizontal lap siding lines |
| **P6-A** | **Roof Slope (Left)** | 1 | $1/8"$ (0.125") | $2.750"$ (2-3/4") | $5.125"$ (5-1/8") | 2' 9" × 5' 1-1/2" | 45° beveled ridge edge; 1.50" porch overhang, 1/4" eaves |
| **P6-B** | **Roof Slope (Right)** | 1 | $1/8"$ (0.125") | $2.750"$ (2-3/4") | $5.125"$ (5-1/8") | 2' 9" × 5' 1-1/2" | Glued to P6-A at 90° internal angle to create lift-off roof unit |
| **P7** | **Roof Alignment Cleats** | 2 | $1/8"$ (0.125") | $2.250"$ (2-1/4") | $1.125"$ (1-1/8") | 2' 3" × 1' 1-1/2" | Triangular offcuts glued to roof underside to drop inside gables |
| **T1** | **Ground Skid Runners** | 2 | $1/4"$ (0.250") | $0.250"$ (1/4") | $4.500"$ (4-1/2") | 3" × 3" × 4' 6" | 1/4" square basswood stock glued beneath deck longitudinal edges |
| **T2** | **Porch Support Posts** | 2 | $1/4"$ (0.250") | $0.250"$ (1/4") | $2.250"$ (2-1/4") | 3" × 3" × 2' 3" | Vertical posts at front porch corners supporting extended roof |
| **T3** | **Doorway Arch Trim** | 1 | $1/16"$ (0.062") | $1.500"$ (1-1/2") | $2.000"$ (2") | 1' 6" × 2' 0" | Arched face molding painted satin white around dog doorway |
| **T4** | **Corner Trim Strips** | 4 | $1/16"$ (0.062") | $0.188"$ (3/16") | $2.250"$ (2-1/4") | 2" × 2" × 2' 3" | Vertical corner boards concealing side wall butt joints |
| **A1** | **Porch Step Ramp** | 1 | $1/8"$ (0.125") | $1.250"$ (1-1/4") | $0.750"$ (3/4") | 1' 3" × 9" | 2-step miniature stair ramp centered at front of porch deck |
| **A2** | **Twin Bowl Station** | 1 | $1/8"$ (0.125") | $1.000"$ (1") | $0.500"$ (1/2") | 1' 0" × 6" | Raised stand with twin silver or red feeding bowls for the deck |
| **A3** | **Bone Name Plaque** | 1 | $1/16"$ (0.062") | $1.000"$ (1") | $0.375"$ (3/8") | 1' 0" × 4-1/2" | Plaque over entry door (e.g., "ROVER", "BUDDY", "COZY") |
---
## 3. Architectural Diagrams & Geometry
### 3.1 Front Elevation (Looking from Porch into Dog House)
```
/ \ <-- Ridge Peak Apex: Y = 4.00" (4.25" from ground)
/ \
/ 45°\ Roof Overhangs: 1/4" Side Eaves
/ \
/ \
+-----------+ <-- Eave Baseline: Y = 2.25"
| [BONE] | <-- Bone Plaque: 1.00" x 0.38"
|==== | .---. | ====| <-- Twin Porch Timber Posts (T2): 0.25" x 0.25"
| T2 | / \ | T2 |
| | | | | | <-- Arched Entry Opening: 1.25" W x 1.75" H
| | | | | |
+=====+=======================+=====+ <-- Deck Surface: Y = 0.25"
| [===== SKID RUNNER T1 =====] | <-- Skid Clearance: 0.25" (3" real)
+-----------------------------------+
|=== STEP A1 ===| <-- 2-Step Porch Ramp
```
### 3.2 Side Elevation & Longitudinal Section
```
|<------- CABIN ENCLOSED (3.25") ------->|<-- PORCH (1.25") -->|
+--------------------------------------------------------------+
\ /
\ 45° ROOF SLOPE (P6) /
\ /
+--------------------------------------------+-----------+ <-- Eave Y=2.25"
| | |
| CABIN WALL (P4 / P5) | PORCH | <-- Front Post (T2)
| (3.00" x 2.25") | POST |
| | (T2) |
+-----+--------------------------------------------+-----------+--+ <-- Deck (P1)
| FOUNDATION SKID RUNNER (T1) | <-- 0.25" H
+=================================================================+
```
### 3.3 Exploded Isometric Assembly Order
```mermaid
graph TD
Skids["T1: Skid Runners (2x)
0.25 x 0.25 x 4.50 in"] --> Deck["P1: Floor & Porch Deck
3.50 x 4.50 in"]
Deck --> RearWall["P3: Rear Gable Wall
3.50 x 4.00 in"]
Deck --> SideWalls["P4 & P5: Side Walls
3.00 x 2.25 in"]
Deck --> FrontWall["P2: Front Gable Wall
3.50 x 4.00 in (with Arch)"]
Deck --> PorchPosts["T2: Front Porch Posts (2x)
0.25 x 0.25 x 2.25 in"]
FrontWall --> ArchTrim["T3: Arched Door Trim & Bone Plaque"]
SideWalls --> CornerTrim["T4: Corner Trim Strips (4x)"]
subgraph RoofAssembly ["Removable Roof Unit (Lifts Off Freely)"]
RoofLeft["P6-A: Left Slope
2.75 x 5.125 in"] ---|45° Ridge Miter| RoofRight["P6-B: Right Slope
2.75 x 5.125 in"]
RoofLeft --> Cleats["P7: Internal Guide Cleats (2x)
Snap inside gables"]
RoofRight --> Cleats
end
RoofAssembly -.->|Drops into place without glue| FrontWall
RoofAssembly -.->|Rests on| PorchPosts
```
---
## 4. Complete Step-by-Step Workshop Guide
### Phase 1: Material Preparation & Scribing (30 Minutes)
1. **Trace the Master Parts**: Using a metal ruler and sharp 0.5mm mechanical pencil or craft scribe, lay out parts `P1` through `P6-B` on your 1/8" basswood or Baltic birch sheet.
2. **Scribe Siding & Deck Planks**:
- On the top surface of `P1`, lightly scribe parallel lines every **1/4" (0.250")** along the length using the back edge of a craft blade. This simulates individual 3" wide outdoor cedar floor planks!
- On the exterior faces of walls `P2`, `P3`, `P4`, and `P5`, scribe horizontal lines every **3/16" (0.188")** to replicate rustic horizontal craftsman lap siding.
3. **Cut the Gable Peaks**:
- On `P2` and `P3`, mark the center at $X = 1.75"$. Mark the eave height at $Y = 2.25"$ on both sides. Connect each eave mark to the top center apex at $Y = 4.00"$. This creates an exact $45^\circ$ slope ($1.75"$ rise over $1.75"$ run). Cut with a razor saw or hobby knife against a steel ruler.
4. **Pierce the Arched Doorway**:
- On `P2`, mark the door boundaries centered on the wall: width from $X = 1.125"$ to $X = 2.375"$ ($1.25"$ wide).
- Vertical straight jambs run up to $Y = 1.125"$ ($1-1/8"$). From there, scribe a smooth semi-circular arch with radius $R = 0.625"$ ($5/8"$) reaching the top center at $Y = 1.75"$. Pierce carefully with light scoring passes.
---
### Phase 2: Base & Wall Assembly (45 Minutes)
1. **Glue Foundation Skids**:
- Turn deck `P1` upside down. Apply aliphatic PVA wood glue (e.g. Titebond) along the two 4.50" long bottom edges. Seat the two `T1` 1/4" square basswood skid runners flush with the outer edges. Clamp or weight with books for 15 minutes.
2. **Erect the Cabin Box**:
- Glue Rear Gable `P3` flush to the rear edge of the deck `P1` at a strict 90° angle using miniature machinist squares.
- Glue Side Walls `P4` and `P5` to the floor, inset 1/8" from the outer edge (or flush), running from the rear wall forward by 3.00".
- Glue Front Gable `P2` against the front ends of `P4` and `P5`. The remaining 1.25" of floor deck projecting forward forms the open lounging porch!
3. **Install Corner Trim (`T4`)**:
- Glue four 1/16" × 3/16" × 2.25" basswood strips vertically over the four cabin corners. This conceals all end-grain plywood layers and provides crisp craftsman corner pilasters.
---
### Phase 3: Porch Framing & Details (30 Minutes)
1. **Seat the Front Posts (`T2`)**:
- Glue the two 1/4" × 1/4" × 2.25" timber posts vertically onto the front outer corners of the deck ($1.25"$ forward of the front wall).
- Check that their tops align horizontally with the 2.25" eave line of the front gable.
2. **Apply Arched Door Casing (`T3`) & Name Plaque (`A3`)**:
- Cut a matching arch trim ring from 1/16" sheet or dense white cardstock and glue it around the entry arch.
- Cut the 1.00" × 0.38" bone-shaped plaque, write your dollhouse dog's name (e.g. *"ROVER"*, *"BUDDY"*, or *"COZY"*), and mount it centered directly above the arch.
3. **Porch Step Ramp (`A1`)**:
- Glue two mini 1/8" basswood slabs together stepped like stairs (bottom tread: 1.25" × 0.75", top tread: 1.25" × 0.40") and glue centered at the front edge of the porch deck.
---
### Phase 4: Removable Roof Sub-Assembly (30 Minutes)
1. **Bevel the Ridge**:
- Sand or plane a slight 45° bevel along the top long edge of `P6-A` and `P6-B`.
2. **Join the Slopes**:
- Place `P6-A` and `P6-B` upside down with their top beveled edges touching. Apply a strip of blue painter's tape across the joint on the exterior.
- Flip over like a book, run a bead of wood glue into the V-groove, fold up to a 90° peak angle, and let cure.
3. **Mount Internal Locator Cleats (`P7`)**:
- With the cabin standing square, place the glued roof on top.
- Mark the inner face positions of the front and rear gables on the roof underside.
- Glue the two triangular cleats `P7` to the underside of the roof panels, spaced approximately 1/32" inside your marks.
- **Result**: The roof will slide down and self-align firmly onto the house without wobbling, yet lift off freely with one hand!
4. **Shingle Roofing**:
- For realistic outdoor shingles, cut strips of 120-grit black emery sandpaper or heavy charcoal cardstock into 1/2" wide strips. Snip vertical slits every 1/4" to simulate shingle tabs.
- Glue strips horizontally starting from the eave and working up toward the ridge with a 1/8" reveal. Top with a folded sandpaper ridge cap!
---
### Phase 5: Finishing & Weatherproofing
* **Stain / Exterior Paint**: Apply a warm golden oak or natural cedar wood stain to the siding and floor deck.
* **Trim Paint**: Paint the corner boards, arched door casing, and porch posts in crisp satin white or dark forest green for authentic Pacific Northwest Craftsman contrast!
* **Bedding & Accessories**:
- Fold a small 2.5" × 2.5" swatch of blue plaid flannel fabric to place inside the sleeping chamber.
- Drill two 3/8" shallow indentations into the porch deck or feeding tray `A2`, gluing in two small metallic eyelets or beads painted silver to act as water and food bowls.
---
## 5. Visualizer & companion Artifacts
* **Interactive 3D Visualizer**: Open [doghouse_visualizer.html](file:///c:/code2026/house/doghouse_visualizer.html) in your browser to inspect the dog house from any 3D angle, toggle the roof on/off, view exploded assembly views, and check dimensions.
* **Master Cut List**: [doghouse_cut_list.csv](file:///c:/code2026/house/doghouse_cut_list.csv) contains machine-readable dimensions for your shop.
* **Printable Architectural PDF**: Run `python generate_doghouse_pdf.py` to produce a high-resolution, multi-page vector blueprint document ready to take to the workshop!